

Hello everyone! ![]()
I'm relatively new to GuildWars, recently bought all the expansions, and I'm having the greatest time with my Ranger's petway Lions' pack.
After completing all campaigns with my Ranger, I now decided to challenge my petway team, by tackling the game's elite zones. I started with the Fissure of Woe, which was quite fun and a bit more challenging than the campaigns.
My next challenge is the Domain of Anguish, which as I understand is one of the hardest zone in the game. That was perfect for me to see how far I could push my petway team, and so I went in mostly blind (I still checked the map routes).
Keep in mind that I'm playing NM, no cons, petway with a big pack of 7 lions (I have one signet of illusion mesmer hero with splinter weapons, so no pet for Gwen).
1st, completing the Stygian Veil:
I got humbled quick and got wiped on the first group after overaggroing. After a few tweaks on my team's build, I went in again, very slowly but surely reached the Stygian Lords quest, and got ambushed in the first trench. Wiped again. Reached the first Stygian Lord (Monk boss) and was met by another ambush = wipe. Went again very carefully, having a better grasp of where the ambushes were located. I finally reached the Dreadspawn Maw, and got wiped as soon as I killed the first tendril when suddenly a group of Stygian demons and many Torment Claws popped up all around my team. I was not prepared. We died. Again. At that point, I knew the whole area and quests fairly well, so I just started again, confident that I could finally complete the Stygian Veil, and I did. But that's when my dumbass realized that I completely forgot to even take the quest "Mallyx the Unyielding" from the NPC in the first place.... Well, another go, this time at least it was smooth sailing to the end. The Stygian Veil: completion time 1h, 6 tries
2nd, completing the City of Torc'qua:
Wiped on first group, but then the rest of the mission was simple enough that I could complete it on my second try. Simply moving forward, dealing with one group at a time. The boss group with Lord Janoth was much harder, but by dealing with it patiently, I wore the group down bit by bit until a frontal engagement became possible.
The City of Torc'qua: completion time 1h, 2 tries
3rd, completing Ravenheart Gloom:
Tormentors seem to be the easiest foes for my team to deal with in DoA. But the cavern bit was tricky, and we got wiped twice there, until I realized that you could stay behind the cavern to ball all the enemies together, which would then easily be bodyblocked by the team's lions' pack. Then reaching the rift and closed it without even fighting any of the incoming foes, as I simply ran past the foes to complete the quest (retreating and fleeing away is surprisingly effective with the pets drawing ennemies' attention, and the "fall back" shouts on my rangers). My first time taking on the Greater Darkness was a complete disaster, I focused all the Darknesses down and was absolutely swarmed with Earth Tormentors, my team fought valiantly, but eventually wiped. So I went in again, this time taking down one Darkness at a time, then killing the spawned Earth Tormentors, which proved to be easy enough.
Ravenheart Gloom: completion time 40min, 4 tries
4th, completing the Foundry of Failed Creations:
Disclaimer: Since I knew that DoA speedclear is a thing, and that groups seem to start from the Foundry as it's the hardest part of DoA. So for this one, I actually checked a video guide to understand the flow of each quest beforehand.
After one wipe in the first room, another in the second room due to bad focus, I finally reached the third room. In theory, I knew that running into the corner and pulling the groups from there was the optimal strategy, but pets proved to be a nightmare in this room, they get countered by Rage Titans, AND they run after fleeing ennemies, aggroing the whole room with them. Got wiped three times in this room. Fourth room was easy enough ,and then we made it to the big foundry room. After many slow and tedious pull and regroup, I reached what I knew would be the biggest challenge of the run, the Fury group.
And that's when it happened. Not only my team was utterly destroyed, but my confidence that I could complete DoA with my petway team too. No matter which pulling angle I tried, how careful I was with my team, my heroes and pets would disappear within seconds of engaging the group (even with precasting ST spirits). Not to mention that the two ennemy monks that make it nearly impossible to trickle down the health of enemies without committing completely to the fight.
It was clear that my previous petway team was not going to cut it. I deemed splinter weapons less than ideal against the Fury group which never seemed to ball up properly and decimated my team within seconds.
Back to the drawing table. My main requirements were: 6 or 7 pets with pet attack skills equipped, no merc heroes, no mesmers in the team, and no ST rit or BIP either.
My next petway build attempt was based around Critical Pet Rangers, all equipped with Zealous Flatbows of the Assassin + Volley + Critical Eye + Disrupting Accuracy and then "Go for the eyes" shouts on non-ranger heroes to provide permanent crits and Aoe disrupts to the team. In theory, I imagined this would be a formidable combo, but in practice, my heroes quickly ran out of energy, and any extended fights (which are to be expected when dealing with titans) became a slog.
Thanks to Enresto198’s comment, I then looked into the Paraway team build that previously beat the Foundry. I already had constant shouts on my core petway build thanks to "Together as One", "Go for the Eyes", and "Fall Back", with the obvious pets synergies, I figured why not take advantage of the various Arias and Chorus and add the 2 Paragons heroes to my team. For good measure, I also swapped Ebon Standard of Battle for "Save Yourselves" on my player pve skills. General survivability in drawn-out fights became amazing. I could often take on two groups together in the third foundry room and still prevail. However, the drawback to this build was twofold, (1) lack of damage and AoE due to very defensive skillsets, and (2) over-reliance on the two paragon heroes (sensitive to bad spike timing from rage titans and driders). These caused all too many wipes in the fourth room, so I eventually dropped the idea.
At this point, I have a good sense of what I needed to achieve to reach and kill the dreaded Fury group:
- Keep the survivability (still without ST or BIP)
- Add a decent AoE to the team
- Add a powerful spiking capability to the team, strong enough to overcome the 2 monks in the Fury group
And here is the final build attempt I went with (I know that it’s slow and that there is still lots of room for improvement, but I suppose clearing the Foundry at all without Cons, Mesmers or Rits means it's decent enough for now):
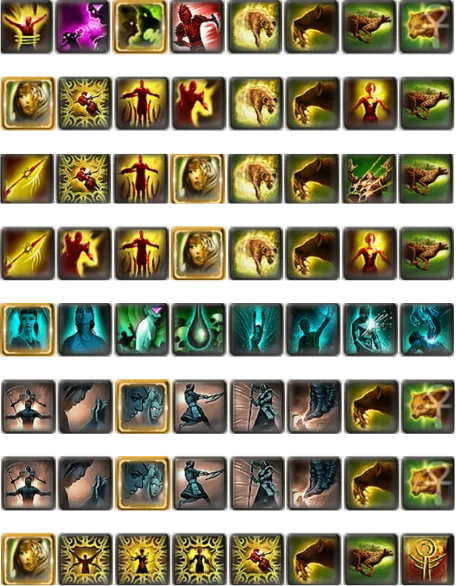
OgkSY5LT4Yylj17i7G4GfG0G
OgkjYxXopOrSxvFeHvbwN+4PDA
OgkjYxXopOAZxvFeVubwN9mPDA
OgkjYxXopOA5dsFeVubwN+4PDA
OAhjYYHbIPssoplwOINncXsxJA
OgKkYxqyqwyj9d++eRwqXyNuh2A
OgKkYxqyqwyj9d++eRwqXyNuh2A
OQKkYtm0JjWzqkD7h1wifcznReD
The most notable changes on this comp were: +2 Dervish Healers + Pain Inverter + Mark of Pain (this skill basically deletes dementia titan groups).
I almost wiped a couple of times due to over-aggroing and had several heroes who died repeatedly in the last room.
Then it was time to face The Fury once more.
I tried pulling a few times from the aggro break point near the forge at the center, but never came close to even killing one of the Guardians of Komalie. So I changed to another pulling angle, tucked beneath the cliffs, I pulled again, without much hope that things would be different. The Fury charged heads-on with the two monks behind him, and then the rest of his group a few steps behind. I thought this would be a good opportunity to go all-in and measure my team's spiking capability, so I called the target and we dived in with the pack. The two monks pretty much negated all initial damage, the rest of the Fury group just closed in, so in a desperate move, I used my pain inverter. THE FURY WAS DELETED INSTANTLY?? My dumb ass literally never thought about using this skill before. It's incredibly powerful with a team full of pets against any AoE damage dealer. I carefully did a similar approach with the rest of the group, and here we are, the final part of DoA cleared. We were now ready for Mallyx.
The Foundry of Failed Creations: completion time 1h30, 20+ tries
5th, Mallyx, the Unyielding
For this one, I wanted to first go 100% blind, no map route, nothing but the threatening name of Mallyx. What kind of beast could the final boss of DoA be? I couldn't wait to discover more.
Luckily, the first part of the mission was more or less the same encounters than the previous DoA missions with similar foes. I cleared all the waves on my first try without wiping, finally ready to tackle Mallyx.
A quick cutscene, and here we are, I see the beast, surrounded by a few spirits. My past experience with Duncan in Slavers' Exile leads me to believe that I should avoid fighting near the spirits and to draw Mallyx far away from those. I wait for him at the gate, he engages our team, his damage seems manageable, slowly and surely losing his HP. I feel confident. That's when I realize that my energy is at 0 and doesn't seem to go back up, I check my team, everyone is depleted. At that point I am guessing this must have something to do with the spirits. Not much time to verify as several groups of Margonites spawn around the team. Without energy, it's a quick wipe. I go to the wiki and read the environmental effects of each spirit (kinda hard to check those in the heat of the action tbh). My suspicion proved correct, the spirit should therefore be the #1 priority before Mallyx.
Going in again, carelessly wiping four times in the first arena part of the mission, then facing Mallyx once more. I ignore Mallyx and rush the Listless Spirit, killing it every time it spawns back, then poking at Mallyx and taking him down with my lions.
Mallyx the Unyielding: completion time 30 min, 5 tries
My first DoA has been a fun ride! What elite zone do you think I should do next with the team? I'm also calling upon the veterans of Guild Wars. Do you think that HM on elite zone is doable no cons, petway, without mesmer heroes?
