
Posts by Stepmother
-
-

Bump
Current offer for the Demon Bladed:
4.7 Bladed Shield, q9 Tac, -2 wEnch - C/O: 40a
-
Updated the current bids again
Slightly less than 4 hours left before I close all bids*.Thank you all for participating, and good luck!
Stepmother
* on items which currently have a bid, and also not on 4.7 (yet)
-
Hello there,
I'm currently in process of selling the following items:
- 1.2 Bo Staff, q11 Smit, 20% HCT Smithing - 5e
- 1.4 Dragon Staff, q12 Death, 20% HCT Death - 5e
- 1.9 Voltaic Wand, q9 ES, 20% HCT Fire & 10% HSR - C/O: 50e
- 2.14 Sharktooth Shield (Gold), Q5 Tactics, 13 AR - 5e
- 2.19 Jeweled Chalice, Inspi - 1e
- 3.2 Ornate Buckler, q9 Tac, -2 wEnch - 5e
- 3.6 Bladed Shield, q13 Tac, -2 wEnch - 5e
- 3.7 Echovald Shield, q10 Tac, -2 wEnch - 80e
- 3.16 Jeweled Chakram, q9 Illu, +30 HP, +10 vs Dragons - C/O: 40e / 1a
There is no point in bidding on these items anymore.
Currently I'm in conversation to sell off the following items:
3.9 Skeleton Shield, q13 Tac, +45 wEnch, Fire - C/O: 20e
3.17 Inscribed Chakram, q9 Dom, 20% HCT Dom, +10 vs Demons - C/O: 70e
4.1 Shield of the Wing, q11 Tac, +30 HP - C/O: 80e
If the original highest bidders don't answer me today, I will be accepting new bids (bids already made before this post still count)
I will be closing all currently open bids on Sunday (so any bids made on Monday don't count), except for the Bladed q9 tactics demon shield, which I will be closing shortly after.
Thank you all for bidding and good luck!
-
-
Sold a few items already.
Tomorrow I'm selling more of the "lesser" items.Thanks all for replying, and happy bidding!
-
Hello there
First of all, thank you all for replying.
I'll be selling some of the "lower tier" items in a few days. I'll take some more time with the more expensive and rare items.
Happy bidding and gl! -
CLOSED
As I won't have time to manage this thread, I will close it. I will make a new thread to sell the remaining (and new) items, whenever I have time again.
Leaving the rest of the thread up for future reference
Top offer means it's the highest offer, but I didn't think it want to sell it for that price.
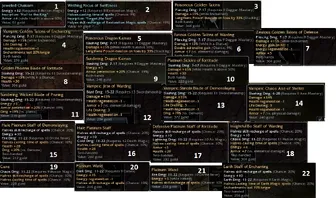
Original Post:
Hello there.
I'm taking offers for everything. I know there are is an item in the screenshot that isnt listed (Demon Round shield), I am not selling it.
I am looking to get rid of most of these items, but if I don't think the offered price is fair, I'm going to keep them for myself (for now).Happy bidding.
Edit: I currently value 1a = 40e
OS staves & wand, Dual vamp items1.1 Bo Staff, q12 Div, 20% HCT Div - Sold 15e
1.2 Bo Staff, q11 Smit, 20% HCT Smithing -Sold 5e
1.3 Bo Staff, q11 Earth, 20% HCT Earth - Sold 8a
1.4 Dragon Staff, q12 Death, 20% HCT Death - Sold 5e
1.5 Dragon Staff, q11 Water, 20% HCT Water
1.6 Platinum Staff, q12 Chan, 20% HCT Chan - Sold 40e
1.7 Platinum Staff, q9 Dom, 20% HCT Dom - Sold 16a
1.8 Wailing Saff, q9 Death, 20% HCT Death
1.9 Voltaic Wand, q9 ES, 20% HCT Fire & 10% HSR - Sold 50e
1.10 Fellblade - Sold 220e
1.11 Gladius - Sold 50e
1.12 Wicked Blade - Sold 50e
1.13 Chaos Axe - Sold 245e
1.14 War Axe - Sold 55e
1.15 Jitte - Sold 55e
1.16 Shinobi - Sold 65e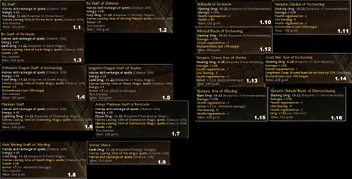
Inscr shields and foci
Q7 Command, 15 AR
2.1 Skull Shield
Q7 Tactics, 15 AR2.2 Ornate Buckler - Sold 15e
2.3 Wooden Buckler (Gold)
2.4 Wooden Buckler (Blue)
2.5 Shield of the Wing - Sold 40e
2.6 Round Shield
Q8 Command, 16 AR
2.7 Skull Shield
2.9 Eagle Defender
2.12 Suntouched Shield
Q8 Strength, 16 AR
Q8 Tactics
2.8 Tower Shield
2.10 Reinforced Buckler
2.11 Tall Shield
Low Req2.13 Great Conch, Q3 Tactics, 11 AR
2.14 Sharktooth Shield (Gold), Q5 Tactics, 13 AR - Sold 5e
2.15 Sharktooth Shield (Gold), Q6 Tactics, 14 AR
Q8 Foci, 12 Energy
2.16 Protective Icon (Gold), Prot2.17 Inscribed Chakram, Dom
2.18 Jeweled Chakram, Illu
2.19 Jeweled Chalice, Inspi - Sold 1e
2.20 Writhing Focus, Resto

OS Shields
+10 vs Dragons
3.1 Ornate Shield, q10 Tac, +41hp wEnch
3.2 Ornate Buckler, q9 Tac, -2 wEnch - Sold 5e
3.3 Gothic Defender, q10 Tac, +30 HP3.4 Aegis, q10 Tac, +30 HP
3.6 Bladed Shield, q13 Tac, -2 wEnch - Sold 5e+10 vs Plants
3.7 Echovald Shield, q10 Tac, -2 wEnch - Sold 80e
3.8 Skeleton Shield, q9 Tac, -2 wEnch
+1 attribute/20%
3.9 Skeleton Shield, q13 Tac, +45 wEnch, Fire - Top offer 20e
3.10 Shield of the Wing, q9 Tac, +10 vs Cold, Death - Sold 5e
+10 vs Type
3.5 Tall Shield, q9 Tac, +10 vs Slashing, -2 wEnch - Sold 100e
3.11 Bladed Shield, q9 Tac, +10 vs Fire, -2 wEnch - Sold 5a
3.12 Bronze Shield, q10 Tac, +10 vs Blunt, -2 wEnch - Sold 100e
3.13 Wooden Buckler, q11 Tac, +10 vs Cold, +30 HP - C/O: 25e (closed bid, sale in progress)
Other
3.14 Wooden Buckler, q12 Tac, -2 wStance, +30 HP
3.15 Shield of the Wing, q11 Tac, -2 wEnch, +45 HP - Sold 8e
Misc items
3.16 Jeweled Chakram, q9 Illu, +30 HP, +10 vs Dragons - Sold 1a
3.17 Inscribed Chakram, q9 Dom, 20% HCT Dom, +10 vs Demons - Sold 100e
3.18 Shadow Bow, q10, +15%/-1 energy

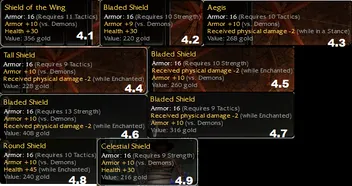
Demon Shields
+10 vs Demons
4.1 Shield of the Wing, q11 Tac, +30 HP - Sold 100e
4.3 Aegis, q10 Tac, -2 wStance - Sold 1a
4.4 Tall Shield, q9 Tac, -2wEnch - Top offer 4a
4.5 Bladed Shield, q10 Str, -2 wEnch - Sold 80e
4.6 Bladed Shield, q13 Str, -2 wEnch - Top offer 15e
4.7 Bladed Shield, q9 Tac, -2 wEnch - Sold 41a
4.9 Celestial Shield, q9 Str, +30HP
+9 vs Demons
4.2 Bladed Shield, q10 Str, +30 HP - Sold 5e
-
Anyone?
Any help is welcome, especially the shields (:
-
Bumpity bump.
Any help is welcome, especially the shields (:
-
I collected some items over the years, and some of them are just clogging up my storage space. A lot of them look vendor worthy to me, but perhaps there are collectors looking out for these types of items.
I guess the game was trying to warn me about the dragon threat in GW, seeing the amount of +10 vs Dragons I got ^^.
I thought this would be the clearest layout, but I can always change it if people don't like it.
OS staves & wandBo Staff, q12 Div, 20% HCT Div
Bo Staff, q11 Smit, 20% HCT Smit
Bo Staff, q11 Earth, 20% HCT Earth
Dragon Staff, q12 Death, 20% HCT Death
Dragon Staff, q11 Water, 20% HCT Water
Platinum Staff, q12 Chan, 20% HCT Chan
Platinum Staff, q9 Dom, 20% HCT Dom
Wailing Saff, q9 Death, 20% HCT Death
Voltaic Wand, q9 ES, 20% HCT Fire & 10% HSRInscr shields and foci
Q7 Command, 15 AR
2.1 Skull Shield
Q7 Tactics, 15 AROrnate Buckler
Wooden Buckler (Gold)
Wooden Buckler (Blue)
Shield of the Wing
Round Shield
Q8 Command, 16 AR
Skull Shield
Eagle Defender
Suntouched Shield
Q8 Tactics
Reinforced Buckler
Q8 Strength, 16 AR
Tower Shield
Low ReqGreat Conch, Q3 Tactics, 11 AR
Sharktooth Shield (Gold), Q5 Tactics, 13 AR
Sharktooth Shield (Gold), Q6 Tactics, 14 AR
Q8 Foci, 12 Energy
Protective Icon (Gold), ProtInscribed Chakram, Dom
Jeweled Chakram, Illu
Jeweled Chalice, Inspi
Writhing Focus, Resto
OS Shields
+10 vs Dragons
Ornate Shield, q10 Tac, +41hp wEnch
Ornate Buckler, q9 Tac, -2 wEnch
Gothic Defender, q10 Tac, +30 HPAegis, q10 Tac, +30 HP
Tall Shield, q9 Tac, -2 wEnch
Bladed Shield, q13 Tac, -2 wEnch+10 vs Plants
Echovald Shield, q10 Tac, -2 wEnch
Skeleton Shield, q9 Tac, -2 wEnch
+1 attribute/20%
Skeleton Shield, q13 Tac, +45 wEnch, Fire
Shield of the Wing, q9 Tac, +10 vs Cold, Death
+10 vs Type
Bladed Shield, q9 Tac, +10 vs Fire, -2 wEnch
Bronze Shield, q10 Tac, +10 vs Blunt, -2 wEnch
Wooden Buckler, q11 Tac, +10 vs Cold, +30 HP
Other
Wooden Buckler, q12 Tac, -2 wStance, +30 HP
Shield of the Wing, q11 Tac, -2 wEnch, +45 HP
Misc items
Jeweled Chakram, q9 Illu, +30 HP, +10 vs Dragons
Inscribed Chakram, q9 Dom, 20% HCT Dom, +10 vs Demons
Shadow Bow, q10, +15%/-1 energy
Demon Shields
+10 vs Demons
Shield of the Wing, q11 Tac, +30 HP
Aegis, q10 Tac, -2 wStance
Tall Shield, q9 Tac, -2wEnch
Bladed Shield, q10 Str, -2 wEnch
Bladed Shield, q9 Tac, -2 wEnch
Round Shield, q10 Tac, +45HP wEnch
Celestial Shield, q9 Str, +30HP
+9 vs Demons
Bladed Shield, q10 Str, +30 HP
-
It's hard to motivate myself to make videos of things I don't like doing, but the videos about this week were so inefficient, I had to make on myself.
https://wiki.guildwars.com/wiki/Nicholas_the_Traveler
https://wiki.guildwars.com/wiki/Sapphire_Djinn_EssenceBuild: OgCjkiqMrSdftXjhOXxkqixlhXA
+1 +3 Wind Prayers, +1 Mysticism, +1 Scythe Mastery
Windwalker's InsigniaWeapon 1: Zealous Scythe of Enchanting with "Guided By Fate"
Weapon 2: Staff of EnchantingThis run I had a lucky spawn, which also makes the run much more difficult. Even so, you can easily survive the fights if you use your skills correctly. At At 1:15, I accidently lost my Mental Block, which isn't a big deal for a small group like this. I can easily ball the ranged foes thanks to my speedboost
"Finish Him!" is an optional skill, I like to take it to finish off single enemies. Staying in the first area is the most efficient.
External Content youtu.beContent embedded from external sources will not be displayed without your consent.Through the activation of external content, you agree that personal data may be transferred to third party platforms. We have provided more information on this in our privacy policy. -
There was little optimization to be done for the past few farms, and this one isn't any different.
The only thing that saves time, is knowing when not to cast enchantments. Since you barely take any hits while aggroing the 3 groups, it's a waste of time to maintain Stoneflesh Aura. Make sure to cast Mantra while running towards the first group, so you have enough energy to cast your second Obsidian Flesh without stopping to get hit.External Content youtu.beContent embedded from external sources will not be displayed without your consent.Through the activation of external content, you agree that personal data may be transferred to third party platforms. We have provided more information on this in our privacy policy. -
Intimidating Aura makes you invincible, so no need for more defensive skills.
https://wiki.guildwars.com/wiki/Nicholas_the_Traveler
https://wiki.guildwars.com/wiki/Shiverpeak_Mane
http://wiki.fbgmguild.com/Speed_Boost_Balling
OgCjkirMrSmXfbEYNXHYcX3l7XA
Weapon 1: Zealous Scythe of Enchanting, with "Guided By Fate"
Weapon 2: Staff of Enchanting
+4 Earth Prayers, +1 Scythe Mastery, +1 Mysticism
Windwalker Insignia, Vigor Rune, Vitae RuneUse speedboost balling for the first two groups. Use the downtime on Pious Haste to cast Intimidating Aura and Dwarven Stability. Make sure to use Mirage Cloak before Vow of Strength, to avoid getting rupted. No need to use Eremite's Attack for the first two.
After the second speedboost group, you refresh your speedboost and run towards the first groups down the cliff. If they are too far to touch with your aggro bubble, use a flatbow to pull them. When you have aggro, continue running until they start breaking aggro (see 1:00) due to the speedboost, and refresh Intimidating Aura. If Pious Haste is still up, wait until it runs out. Run towards the remaining groups and make a ball like in the video. If the first group starts breaking (if they were far away), simply run back a bit and wait for them to return to you.
Sometimes the Protectors run out of the ball, simply kill them after you killed the main ball. Ignore single stragglers, they aren't worth the time unless they are already damaged from the spikes.External Content youtu.beContent embedded from external sources will not be displayed without your consent.Through the activation of external content, you agree that personal data may be transferred to third party platforms. We have provided more information on this in our privacy policy. -
Better late than never.
https://wiki.guildwars.com/wiki/Nicholas_the_Traveler
https://wiki.guildwars.com/wiki/Branch_of_Juni_Berries
Quest: https://wiki.guildwars.com/wiki/Insatiable_AppetiteThis is a very easy, braindead, and consistent way of getting at least 3 berries each run, while also minimising the time spend moving between Chuno and the enemies. When farming for multiple sets, it's definitely worth it to do the small quest chain leading up to this quest.
Setup: 3 N/Rit heroes, OAhDYMhlB3VFAAAAAAAA
2 Rt/N heroes, OASiEyE4cHuYJXAAAAAAAAA
1 P hero, OQCigym8wj3xybcMAAAAAAAExplantion: 6 Death Magic gave the most consistent result. 8 Blood Magic for BiP breakpoint. Paragon hero is used for movement and for WSR, in case ressing is too slow. If you don't have 2 Ritualist heroes, you can play with 2 N/Rits instead, but more focus is required.
Alternatively: load up a single target build, take a few PURE HEALING heroes, and a hero with permantent "Fall Back!" and "Incoming!", run to the farm south-east, to the insect Monk boss, and then to the kournans to the north-east.External Content youtu.beContent embedded from external sources will not be displayed without your consent.Through the activation of external content, you agree that personal data may be transferred to third party platforms. We have provided more information on this in our privacy policy. -
Current guides were almost efficient. This is how to do it faster:
External Content youtu.beContent embedded from external sources will not be displayed without your consent.Through the activation of external content, you agree that personal data may be transferred to third party platforms. We have provided more information on this in our privacy policy. -
As promised: 14 Charrs eligible of dropping Superb Charr Carvings, in under 2:30min.
Link to gwpvx page with in+depth explanationExternal Content youtu.beContent embedded from external sources will not be displayed without your consent.Through the activation of external content, you agree that personal data may be transferred to third party platforms. We have provided more information on this in our privacy policy. -
Since the current videos on Superb Charr Carvings are very inefficient, I will be releasing an efficient video either this evening or tomorrow, so stay tuned!
-
Unfortunately, there does not seem to be a more efficient farm this week, so I will be not making a video.
Stay tuned for next week! -
Why invest into defensive skills, when you can use Vow of Strength to blow up the mobs instantly.
See video description for more info!External Content youtu.beContent embedded from external sources will not be displayed without your consent.Through the activation of external content, you agree that personal data may be transferred to third party platforms. We have provided more information on this in our privacy policy. -
Dervish can farm the Ruby Djinn Essences quite fast and effective. Stay in the first chamber.
External Content youtu.beContent embedded from external sources will not be displayed without your consent.Through the activation of external content, you agree that personal data may be transferred to third party platforms. We have provided more information on this in our privacy policy. -
This week is a good example of how you can do it on a much more effective way.
External Content youtu.beContent embedded from external sources will not be displayed without your consent.Through the activation of external content, you agree that personal data may be transferred to third party platforms. We have provided more information on this in our privacy policy. -
Hello there
While there already are people who do videos on Nick sets, I often notice that they often show a very inefficient way of farming them. When I can think of a much better, and faster way, I will make a video to showcase how it's done efficiently. Sometimes I use some more advanced tactics from speedclearing, to speed up the farm (usually something with speedboosts), and to make people more aware of these mechanics.
Happy farming
-
Need some help with these items.
Thanks.