Wow that's insane.
Now do WoC
Already at cleansing zen daijun on that! So its coming along!
Wow that's insane.
Now do WoC
Already at cleansing zen daijun on that! So its coming along!
Been a while, updated the listings to match that of the actual post on presearingboards.
Bumping ![]() dont be afraid to bid
dont be afraid to bid
Axe C c/b still 3 bd until they reply to buy it
Updated sheet based on recent sales/bumping
Hello, I was wondering what the value of this drop would be?
Sea Purse Shield
16 armor
q8 Tactics
Inscribable
BLUE quality not gold
Offhand E - 3bd
Axe C 3bd
C/B for those
axe 14% sold
Bumping this ![]() remember guys you can bid what you want
remember guys you can bid what you want
Axe A- 3bd
Wand E- 5bd
Staff B- 5bd
Staff C- 10bd
Added to c/b! thank you
Edit: C c/b is now 15bd from someone else
Edt2: All these items sold
https://presearing.boards.net/thread/4551/la…sale-okay-lower
Here is the official thread. But copy-pasting:
Charr Slayer Mods
(x1)Sword Pommel Of Charr Slaying 16% [7bd]
(x1)Sword Pommel Of Charr Slaying 15% [4bd]
Staff Wrappings
(x1)Smiting Prayers +1/18% [3bd]
(x2)Protection Prayers +1/18% [1bd]
(x1)Fire Magic +1/18% [25bd]
(x4)Fire Magic +1/17% [10bd]
(x1)Domination Magic +1/18% [5bd]
(x2)Domination Magic +1/17% [1bd]
(x3)Blood Magic +1/18% [1bd]
(x6)Death Magic +1/17% [2bd]
Furious Mods
(x5)Furious Sword Hilt 9% [10k]
(x1)Furious Axe Haft 9% [10k]
(x1)Furious Hammer Haft 9% [10k]
Sundering Mods
(x1)Sundering Sword Hilt +20/18% [10k]
(x4)Sundering Bow String +20/18% [10k]
Other Weapon Mods
(x1)Bow Grip Of Fortitude +28 [5k]
Other Slaying Mods
(x1)Sword Pommel Of Troll Slaying 18% [n/a]
(x1)Sword Pommel Of Pruning 18% [n/a]
(x1)Bow Grip Of Dwarfslaying 18% [n/a]
Full Weapons
Bows [n/a prices]
Bow A

Bow B
Bow C

Bow E

Bow G

Bow H

Bow I

Bow J

Bow K

Bow L

Axes
Axe B [7bd]

Axe C [6bd]

Axe D [n/a]

Hammers
Hammer A [4bd]

Swords
Sword A [3bd]

Sword B [3bd]

Sword C [3bd]

Sword D [5bd]

Sword E [1bd]

Sword F [4bd]

Sword H [8bd]

Sword I [5bd]

Sword J [3bd]

Staves
Staff A [5bd]

Wands
Wand A [2bd]

Wand B [3bd]

Wand C [3bd]

Wand D [2bd]

Wand G [3bd]

Wand H [2bd]

Wand I [3bd]

Wand J [2bd]

Wand K [4bd]

Shields
Shield C [2bd]

Shield D [1bd]

Shield E [1bd]

Shield F [1bd]

Shield G [2bd]

Shield I [1bd]

Shield J [2bd]

Shield K [1bd]

Shield M [2bd]

Shield N [n/a]

Off Hands
Off Hand A [1bd]

Off Hand B [2bd]

Off Hand C [2bd]

Buying all cupcakes, eggs, and corn in pre searing! Let me know how much you got and we can come to a price aggreement! I am a serious buyer
Update: Need 49k alc, 58k sweet/party.
Offering service of giving pre Nick sets to you and 250g per account, for the gifts assuming you don't bother normally. As well as offering you giving me post Nick sets and I give you the gifts for the service of you doing it for me in pre to make equal value.
Everything on the above post is sold.
New: EL master of whispers 1 bd, mini mox 4bd, mini gwen 3bd, mini flame djin 1 bd.
Need 55k Alc, 58k sweet, 58k party
I got to try that on my pre
I say go for it! It is only a small chunk of hours longer than ldoa. This took me about 19 hours?
Awesome idea and execution!
Did you learn anything new for Pre/Levelling or was it just using knowledge from LDoA runs?
Actually did learn a couple things!
And thanks guys, me and alex definitely were happy to pull this off
Buying Jars of honey in pre, will buy as few cupcakes too if you have. IGN Wintersday L D O A
I think in the future updates section mentions something about it, but if not i will definitely add it thanks steve. someone actually had mentions other bonus weapons and we were discussing how some of them were actually better. however only those on the guide ofc are able to be had now if not already owned outside of difficult pricy methods. definitely worth adding a note nonetheless!
LDoA Guide for Elementalist by Shade
For LDoA in under 18 hours - Version 3.0
![]() Note: This is a direct copy past from the official guide page here, so feel free to visit it as well. Some of this might not have moved over nicely, but will try and make sure it looks as smooth as possible. Currently all word links on this page also link to the original guide page, and that section tied to that link.
Note: This is a direct copy past from the official guide page here, so feel free to visit it as well. Some of this might not have moved over nicely, but will try and make sure it looks as smooth as possible. Currently all word links on this page also link to the original guide page, and that section tied to that link. ![]()
This guide is focused on getting the Legendary Defender of Ascalon title for the Elementalist profession as fast as possible with little to no outside help. The main goal is around 12 - 16 hours. This guide is under the assumption you have the bonus weapons and summoning imp. The guide is always open to being updated. If you have any questions, need assistance, or anything you would like to assist with, please feel free to contact me through my discord: Shade#2029
Video playlist to follow with the guide here.
Unless you are instructed to do so, do not turn in any quest rewards.
This first section is mainly about setting up your character and setting up quests for later so you can easily turn them in at level 16. For an in-depth explanation on why level 16 is the level you should turn quests in, see here.
1. Start by creating your character. Enter /bonus and set your weapon sets up.
Click here for the sets.
2. Talk to the Town Crier and take the quest Message From A Friend.
3. Choose option 1 or 2. For more info on this matter, click here.
Option 1: If, at level 16, you will be able to use another account (an alt account or a friend) with a new character of the same primary profession as you, turn in Message From A Friend. Go outside into Lakeside County and take Elementalist Test. Go back inside Ascalon and take War Preparations. Walk back out into Lakeside, and proceed to step 4.
Option 2: If you will not be able to do the alternate account method, do not turn in Message From A Friend. Go outside into Lakeside County and take the quest Elementalist Test. Proceed to step 4.
4. Complete and turn in Elementalist Test for the reward. Do not take Further Adventures. Walk northwest to Lady Althea and take A Mesmer’s Burden. Kill the Rogue Bull and go to Ashford Abbey and enter.
For shortcut details on Elementalist Test, click here.
5. Take A Monk’s Mission. Go into the Catacombs.
Can also take The Necromancer’s Novice and Rites of Remembrance. See here on how to complete this safely.
6. Complete the objectives for A Monk’s Mission, making sure the final part of A Monk’s Mission triggers.
If you did the faster method above, you will also be completing Rites of Remembrance during.
7. Then go take The Necromancer’s Novice and Rites of Remembrance from Munne and complete Rites of Remembrance first, then follow Muune and complete The Necromancer’s Novice, killing all foes you see along the way. Map back to Ashford.
Depending on how you did step 5, Munne might have already moved towards her quest, or she will be back up by the portal. You can also use the Longbow you have to pull the Nightmare into the last explosion rune to kill it instantly and from afar.
8. Exit into Lakeside and walk southeast and pick up the Beautiful Feather. Then take quests Little Thom’s Big Cloak, The Hunter’s Horn, Unsettling Rumors, and The Worm Problem.
9. Head south into Wizard’s Folly; continue south and enter Foible’s Fair. Talk to Ralena to take The Supremacy Of Air quest.
10. Exit into Wizard’s Folly. Head southwest to Elementalist Aziure and take The Elementalist Experiment.
11. While waiting on the foes to spawn and ball on her, go kill the Tower Golem off to the north for The Supremacy Of Air. Come back and kill the Ice Elemental Shards to finish The Elementalist Experiment quest; then map to Ascalon City.
12. Accept the following quests: The Poison Devourer, Bandit Raid, The Wayward Wizard, Charr At The Gate, Trouble In The Woods, and Poor Tenant. Map to Ashford Abbey and complete the next objective for Unsettling Rumors by talking to Meerak.
This following section is purely about getting yourself to level 7 so you can go farm charr solo and efficiently.
13. Exit into Lakeside and farm the bandits from the Bandit Raid quest outside of Ashford until Level 7.
For information on how to optimally do this, click here.
14. As soon as you hit Level 7, head over to Devona and complete the objective for Trouble In The Woods. Then head into Regent Valley.
15. Go south and take The Ranger’s Companion from Master Ranger Nente, and go tame a Melandru’s Stalker. Now walk to Fort Ranik and enter.
16. Map to Ascalon City and exit into Lakeside. Follow and complete the objectives for Charr At The Gate, then take Across The Wall from Gate Guard Torin who will be nearby. Now enter into The Northlands.
For more info on the gate to enter The Northlands, click here.
You will now begin farming Charr. The guide to do so is here.
This next section will be focused on farming Charr until level 10.
17. Go complete the first objective for Across The Wall, killing any foes along the way, some of which will be Charr. Once Ben is with you, bring him back to complete the quest but not accept the reward. Then farm Charr and other enemies, using the route from the video in the Charr farming guide section linked above.
18. Once you hit Level 10, map back to Ascalon City to pick up the daily Vanguard Quest.
Vanguard Quests Break Down
This section will go over how to best manage Vanguard quests and farming until level 16. Do NOT turn in or even try completing Vanguard quests unless stated to. This is because sometimes farming the enemies is more beneficial than just doing the quest itself. For an in depth description of how the leveling works, click here.
From level 10 until level 14, you will want the Footman Tate quest, as it will spawn Vanguard foes along your normal Charr route. For days that are not Tate, do the quest and turn the reward in, then go back to Charr farming. For a video on the upgraded charr route with Tate, see here.
From levels 14 to 20, you will want Farmer Hamnet. You can stick with Tate the whole way and still do it in around 16 hours or so, but Hamnet will allow for times closer to 12 hours. Some find Hamnet more boring and find the slightly slower Tate method to be easier on the brain. Use the same method of lining up the days of these two quests and do the other Vanguard quests the day before, this way you get a couple thousand EXP and also will have the quests back the next day, unless you are doing this all in one day which is definitely possible.
The Vanguard Daily Cycle page can be found here.
19. Get Vanguard: Footman Tate quest if possible, and continue Charr runs, now including Vanguard foes from Tate, until level 14. You now can swap to Vanguard: Farmer Hamnet quest, making sure to get your 1,000 EXP reward from the Tate quest first. Farm the first 2 foes outside Foible’s, then reset doing the /resign trick, over and over. Optionally, you can continue doing Footman Tate runs only, along with Charr Bosses if you prefer.
You stop getting experience from Charr Shamans at level 13, and all other Charr at level 14, although you still get XP from the Charr bosses until level 16. This is why you move on to only Tate and Bosses tor to Hamnet at level 14. You do NOT need Tate to do Charr runs from 10 until 14, it just makes it faster.
For a video guide on Tate and Hamnet runs from 14 to 16, click here.
20. Once you hit level 16, you will now be completing and turning in all of the side quests. Depending on which leveling method you chose, see below on how to begin.
If you did Tate runs from 14 to 16: Die to respawn at the shrine, assuming you are mid run, enter Lakeside, and turn in Across The Wall to Torin. Then map to Ascalon City and turn in Unsettling Rumors.
If you are choosing to NOT keep doing Tate runs until 20, instead of dying to respawn, complete the quest so you can get the reward in a bit. Also, Survivors would just run back to the gate regardless.
If you did Hamnet runs from 14 to 16: Map to Ascalon, and exit into Lakeside and walk over to the gate to The Northlands and turn in Across The Wall to Torin. Then map to Ascalon City and turn in Unsettling Rumors.
If you are choosing to NOT keep doing Hamnet runs until 20, complete the quest so you can get the reward in a bit. Though Hamnet is the fastest method.
For a video guide of all of the steps for turning in quests at level 16, see here.
21. If you have War Preparations, now is the time to bring the second account or player of the same profession as you that has not completed the first quest, into your party. Alternatively, if instead you have Message From A Friend, turn it in now. Also try to bring an extra person or account with you regardless for the next quest.
22. Exit into Lakeside and take the quest Adventure With An Ally and immediately accept the reward if you have someone with you, or come back with someone later and accept it. If you have War Preparations, turn it in. These are the only uses for a second account/player.
23. Take Gwen’s Flute quest from Gwen, and Further Adventures from Haversdan. Then head south to the devourer cave, picking up the Broken Flute along the way. Accept The Egg Hunter from Duke Gaban before going in, and complete the objectives for both The Poison Devourer and The Egg Hunter. Turn in The Egg Hunter and head into Regent Valley.
24. Go turn in the reward for The Ranger’s Companion, head to the objective for The Hunter’s Horn and complete it, then go back into Wizard’s Folly and turn the quest in to Aidan.
25. Then map to Foible’s. Do the objective for The Wayward Wizard. Then enter Wizard’s Folly.
26. Head north, and then west, killing bears until you get a Bear Pelt. Continue and talk to Orion Elek to finish The Wayward Wizard. Go enter Green Hills County and then run north to The Barradin Estate and enter.
27. Map to Ashford and exit into Lakeside. Complete Bandit Raid and turn it, as well as Further Adventures, and Trouble In The Woods in to Devona. Then take Opposition To The King, and Tithe The Ashford Abbey. Complete and turn in Poor Tenant. Update Little Thom’s Big Cloak. Talk to Pitney, complete The Worm Problem and turn it in, then pick up The Prize Moa Bird and map to Ascalon.
28. Turn in The Wayward Wizard and Charr At The Gate, then pick up Charr In The Catacombs.
29. Exit into Lakeside, turn in Gwen’s Flute, then grab A New Elementalist Trainer from Haversdan and head over and trigger the dialogue between Rurik and Osric. While waiting, go take the quest The Rogue’s Replacement from Old Mac, and immediately turn it back in to him. Then go back and pick up A Gift For Althea quest. Turn that quest in to Althea, not Osric, as well as A Mesmer’s Burden and choose to take Mesmer as your secondary profession.
30. Map to The Barradin Estate and turn in Little Thom’s Big Cloak, then take The True King. Update Opposition To The King, then map to Fort Ranik and turn in The True King. Exit into Regent Valley. Get the quest The Orchard and go complete and turn in this quest. Map to Foible’s Fair.
31. Take Domination Magic from Vassar. Exit into Wizard’s Folly and complete Domination Magic, then map back to Foible’s Fair. Turn in Domination Magic.
32. Exit into Wizard’s Folly and head to the wizard tower to turn in The Elementalist Experiment, The Supremacy Of Air, and A New Elementalist Trainer.
33. Now map to Ashford, Turn in A Monk’s Mission, The Poison Devourer, and complete the objective there for Charr In The Catacombs and then enter the Catacombs. Turn in Rites Of Remembrance and The Necromancer's Novice. Complete the objective there for Charr In The Catacombs.
34. Go back to Ashford, enter Lakeside, then continue into Green Hills County and do the objectives for Opposition To The King and Tithe The Ashford Abbey, then take and complete Grawl Invasion and turn it in. Map to The Barradin Estate.
35. Exit into Green Hills and enter the catacombs. Go to Oberan and complete the objective there for Charr In The Catacombs. Then head over and complete The Prize Moa Bird. Map to Ashford.
36. Exit into Lakeside. Go turn the quests Opposition To The King, Tithe The Ashford Abbey, and The Prize Moa Bird in. Then map to Ascalon.
37. Head over to Halbrik and purchase Empathy from him. Turn in Charr In The Catacombs. Take A Second Profession quest and turn it in. Take and turn in The Path To Glory and do not enter the mission.
If you choose to enter the mission by accident, either exit into Lakeside, or map to another area ASAP, as loading into it will lock you in it forever.
38. Your level 16 should be near finished. Load the proper bar and use this bar to finish the rest of the title. Template: OgVEwkiiOBshGcUMyCjCt
You will get 9,800 EXP from turning in side quests excluding War Preparations and Message From A Friend. If you turn in War Preparations you will get 10,050 EXP. If you turn in Message From A Friend you will get 9,900 EXP. Level 16 to level 17 is 11,000 EXP so you will need some runs to level to 17. This is also almost equal to just a single Vanguard quest reward if your days line up well.
39. Now continue farming the Vanguard foes of your choice, Tate or Hamnet, turning in the daily quest rewards when lining up, until level 20.
When you are 1,000 EXP away from level 20, complete the objectives for the current Vanguard quest you are doing, and then just turn it in for your last 1,000 EXP. Also keep in mind, Hamnet again will still net faster EXP.
40. Congratulations, you now have Legendary Defender of Ascalon for your Elementalist faster than you ever expected!
Extra Material
Updates (Current version is 3.0)
New Updates:
Finally got around to working on this again. The major difference in 3.0 from 2.0 is no more Necromancer secondary, we now opt to Mesmer for better and faster farming later levels. The extra experience gained from choosing Necromancer secondary is easily outweighed. Also, more optimal routing for turning in quests was added, cleaned up organization, as well as finished explaining all of the steps and coloring the quest names. I also finished discussing the multiple Vanguard quest options. Another big change was more focus on those wanting Survivor, and the proper notes should be added now in the guide for them.
Upcoming Updates:
Things that I would like to improve on this for the future are mainly reworking the videos. They are outdated now for the most part of of low quality. Besides the videos, there are a couple parts such as turning in Across The Wall, adding notes about people who might also have other bonus items, and adding to the special thanks page. It might also be worth adding a note about Gwen’s Flute quest bugs as well. I imagine a lot of the new stuff I added will need to be edited for typing corrections too. I also plan on continuing the variations for each profession as time goes on.
Again, if anyone has any feedback or questions please feel free to message me on my discord listed at the top of this guide. I will be turning the ability to place comments on and off again depending on how things go. There are a lot of troll comments such as random letters and spacing, that made it not worth it for the few who did actually use the comment system properly.
Bookmarks
Full Video Guide:
Steps 1 - 12: https://youtu.be/KPapS6icFOM
Step 13: https://youtu.be/Uj5ibfqXQgk
Steps 14 - 17: https://youtu.be/XoH1t1kWygk
Step 17: https://youtu.be/FiTdpSilOwo
Steps 18 - 19 :
Part 1 https://youtu.be/ZPIjjAgGqqA
Part 2 https://youtu.be/kGm5R6eYj1M
Part 3: https://youtu.be/gtat9B0_o6g
Steps 19 - 20: https://youtu.be/De5lM8areYA
Steps 20 - 38: https://youtu.be/K7Vl2jy_Si4
Steps 38 - 40: https://youtu.be/De5lM8areYA
Hamnet Version: https://youtu.be/aK9e3z262Ng
Level 16 Quest Turn In Breakdown:
So a lot of people use to say turning in quests at level 19 was the way to go, which was true for death leveling. Then Vanguard quests came out and people changed this to level 9 or 19. Many people were blinded by how fast Vanguard quests sped of the title, that nobody bothered to actually look for optimal ways of doing it for a long time.
The best place to turn your quests in now is level 16. Breaking it down, we can see to get from level 16 to level 17 takes 11,000 EXP. To get from level 19 to level 20 takes 12,800. Lastly, level 9 to level 10 is only 6,800. However the big kicker here is EXP earned from kills. At level 9 you are almost getting 80 experience a kill for farming charr. At level 16, due to Vanguard scaling, you are getting the lowest amount of EXP possible, 16 a kill. At level 19, again due to level scaling, you are now getting 32 EXP a kill, which is double the amount of EXP earned at 16. With level 19 to level 20 only being a 1,800 difference, level 19 is almost TWICE as fast as level 16 to level 17.
So as you can now see, level 16 is by far the most optimal level to turn your quest rewards in at. Level 9 to 10 goes by super fast just doing charr runs, you should never turn quests in at 9.
1: The weapon setups are: Luminescent Scepter with the Tiger’s Roar, Nevermore Flatbow with the Serrated Shield, Luminescent Scepter with the Serrated Shield, and the Soul Shrieker with the Serrated Shield. Discard the rest.
3: If you choose the first option, the NPC to get the reward for War Preparations will no longer appear for you after accepting the reward for Elementalist Test. Thus, you need another character that can spawn the NPC to turn the reward in at level 16. Also, due to having War Preparations active, you cannot take Elementalist Test without taking the reward for War Preparations, thus requiring the weird order of quest taking so you can get the reward for both.
If you don’t have a second account or friend, choose the second option: You cannot take War Preparations if you have a Message From A Friend active without turning it in. Also, Message From A Friend is no longer available to take after taking War Preparations. Thus, your best choice (other than the first) is saving Message From A Friend until level 16.
4: If you want to save a few seconds, as soon as you enter Lakeside, walk back into Ascalon City and then walk out again. That way you can /resign as soon as you pick up the shimmering scale and you can walk out and turn the quest in so you don’t have to walk all the way back. You can also let your imp finish off the bull while you make your way to Ashford, make sure it dies in compass range so you get the experience however.
5. Since you cannot heal Paulus due to changing your monk skills for necromancer ones, you will need to make sure you kill the enemies ahead of him so he will not stop in the degeneration to fight. Paulus will stop moving when you are not near him so make sure you stay in range. He will survive without need of healing skills as long as he does not have to stop for enemies. On your way back with him, once you get to the last flight of stairs before the exit into Ashford Abbey, you can leave Paulus to walk the rest of the way on his own, completing the quest objective so you can go ahead to where Munne ran to. You can confirm this by checking the chat. Steps 6 and 7 are part of this.
13. Guide To Farming Bandits:
Video: https://youtu.be/Uj5ibfqXQgk
Exit into Lakeside County, then back into Ashford. This is to set up the resign trick. Run back out into Lakeside and go northeast, aggroing both Wolves (as well as Striders if you see one on the way) and all of the bandits. While running cast Life Siphon on the Wolves or Striders you may find to help survive.
Then once you have balled everything, use your Igneous Summoning Stone and nuke the enemies with Fire Storm. The first few runs might take around 1 minutes and 20 seconds or more, but once you get the hang of it and level up, each run should take less than a minute. Add as many points as you can into Fire Magic, with any extra into Energy Storage.
For Survivors, do be careful your first few runs as it might take a little to get use to. It is okay to split the ball up if you are uncomfortable at first.
Build Code: OgRAA0KcxInWbAAA (This is with Necromancer secondary, so you will not be able to directly load it, however you can still see it in-game to copy)
16. To enter into The Northlands, pull the lever up top and quickly run down to get inside before the first gate closes. You can do this solo after updates to the game made in early 2018, as it now stays open just long enough to get inside.
17. Guide to farming Charr:
Video: https://youtu.be/FiTdpSilOwo
It is faster to purposefully die, usually after clearing the boss area. This allows you to just respawn and run through the portal to reset faster (same if you accidentally die). However, for people going for Survivor, you should map to Ascalon to reset. Also for Survivors, do be careful when aggroing charr groups, and always be prepared to map out if you are not comfortable.
Make sure your Imp is summoned, and if there is a mesmer in the group, a Chaot, do not use any enchantments. You should also use Troll Unguent right before engaging. Send your pet in with the attack command and let it grab the aggro. Cast Fire Storm on the healer and ranger. If any warriors come to you let the Imp grab the agro. Continue kiting and focus the warriors when they use frenzy. Save the mesmers and necromancers for last as they do very little compared to the warrior and rangers. Make sure the healer dies early too. Also, when possible, use cover to your advantage. Take advantage of having a blind as well, use it on rangers mainly or if there are none, warriors if they get to you. For Bosses, be sure to pull carefully with your bow.
Build: OgJAE0SYFDZcDA+m2 (This is with Ranger secondary, so you will not be able to directly load it, however you can still see it in-game to copy)
18. You can now start picking up your daily Vanguard quests, which scales foes levels based on your level. As stated, the best quest to have changes depending on the section. However, Vanguard foes will soon become the only way to level up. The scaling works as follows: They start level 8, while you are levels 10 - 13. Then, once you level up to 14, the Vanguard foes move up to level 11 until you reach level 17. They then become level 15 and stay that way even after you hit level 20. Certain bosses or special enemies can be higher level but thats dependent on the quest.
Video of updated Charr route with Tate: https://youtu.be/ZPIjjAgGqqA
Guide for 14 to 16 Vanguard Questing:
Video for Tate runs: https://youtu.be/De5lM8areYA
This is the most optimal route of foes you will want to follow and kill for Tate questing, even if you choose to do this until level 20. The bosses are optional from 14 to 16 but give no EXP after that and should be skipped.
Video for Hamnet runs: https://youtu.be/aK9e3z262Ng
This is a very straightforward run and farm, however it does get boring. The /resign trick is exiting into Wizard’s Folly and then walking back into Foible’s Fair, then continuing the farm.
Guide for turning in side quests:
Video: https://youtu.be/K7Vl2jy_Si4
*Note: that this is slightly out of date and needs to be remade.
Special Thanks
Thanks to Owls ‘(o,o)’ who edited most of this and assisted with tests and ideas.
Another big thanks to Hydrothermal who helped with testing, as well as a side project that is still in the works for visual support with quests.
Thanks to Bsoltan who has also helped test things.
Thanks to Steve1 on the wiki for helping organize all the information and correcting it from things I have found.
Thanks to JnvSor who has taught me how to work a few things such as making texmods, and ideas for routings.
And the biggest thanks of all is to all members of the community who has given feedback or helped in small ways.
Except for melee enemies such as warriors. And shit, I've drained enemies to 0 energy before killing them with esurge plenty of times with only 2 mesmers in the party. Do you play without consets or headpieces or what? But even if they didn't fall to 0 energy, Ineptitude deals more damage than Esurge.
I don't generally do simple content with a conset. I might pop one if it's a very very large area to vanq or if I'm doing elite content. But even then I never have issues of my esurges do no damage. Sure there might be some moments in fights if every esurge hits the same exact enemy, the one following might not do damage. But that's rare. Ineptitude had a higher number. But with the higher energy cost, requirement for it to go off, and illusion skills just being overall weaker than Dom ones, you cant say this specific team comp is worse just by the fact it has another es than inept. However feel free to test it yourself and see which you like more. Testing done by multiple community members has deemed this to be better without mercs. The air ele is good for anti melee as was inept, it may not do as much as inept but combined with airs armor pen as melees will have more armor than casters anyways, and the extra over all damage and cc from the esurge mesmer, this was what it's evolved to. Like I said, I still use 2 es 1 inept and clear content fine but I have tried this and it's worked a little better in general. I just play mostly on my Mesmer so there's 3 esurges already. And I still rarely ecounter the very very rare chance of my esurge doing no damage
Come on Misty, a minion master? And why is there no ineptitude but three esurges, that will drain enemies to 0 energy before they die often.
Because 3 esurges are better than 2 esurges and an ineptitude. Hence why they transitioned into bsurge ele. I still use 2 esurge hybrids and ineptitude hybrid on my mesmer. 3 esurges are not going to drain every enemies energy down to 0 energy. and if they somehow magically did do that before they died, then they are no longer using skills! there for making them much easier to kill.
Hi, I am not a collector really so was told to come here to get some PCs on some items. Thanks for any helpful tips.
OS Holy Branch q10 DF
HCT 10%
e +5
ench 20%
OS Channeling Rod
q9 chan
hct 19% resto
hsr 20% resto
OS Brute sword q9
15^50
ench 20%
poison duration 33%
insc q8 flame artifact max gold
insc q8 command gold leaf max blue
Edit since i do not want to break bump rules: Alright, i will include the skin images too if i move forward with any, thank you all for the input.
So I put together a video going over the long process of how I came out to find the highest HP possible in GW1. Thought some people here might find it interesting.
i dont think it "definitely destroys" them. its still a green bag and only obtainable from pre, free 10 slots, and can still hit the 15. the upgrade is insanely costly as is anyways which is why i dont think itll change too much.
this is awesome and all, just got it to work as well. but the issue is it does not include the attributes as part of the display thats given with the build code. the skils appear as if 0 is in the attribute. if this can be fixed then i believe this can really become useful here for legacy. also cannot seem to place the build where i want it, as the template that visually shows ignores placement commands, unless theres something special you need to do
So since I have been grinding out my luxon title recently I decided to go ahead and update the old meta of MQSC with the more faster version people use now. All information is on the pvx regarding weapons, build, armor, etc, but will put a general summary up here.
Click here for the PvX page I am working on, still curently in progress but the main idea is there.
I also made a quick placeholder route by route video showing exactly where to go and what to do for each: Click here for video guide
So what are the advantages to this than the older way?
What are the disadvantages?
The team on PvX is under the assumption you have 8 players, however at the bottom I do mention how it would be if you have less, as well as mention what I did here regarding merging with the old way or non-sc oriented players. Due to a lot of hours being low activity, sometimes I have even brought one random player with 6 heroes, and they will vanquish around half, and I will vanquish everything else solo on a derv. These runs even average to 8-11 minutes with just that.
Build for all dervs:
[build=Ogekwiq6K/Jk513W3HuDNZuI3F7F]
Below are all the route images so you can see the general idea. In-depth guide for each role is covered on the PvX page linked at the top.
| Yeti Ranger/Rit Route | Yeti Cave Route |
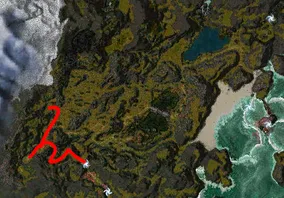 |
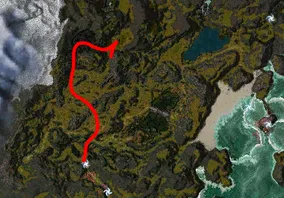 |
| Wallow 1 and 2 Route | Wallow 3 and 4 Route |
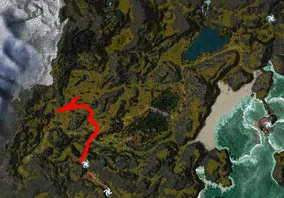 |
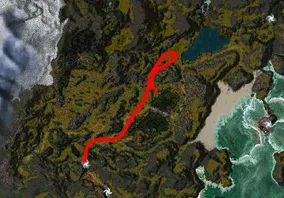 |
| Lake Route | Lake Cleanup Route |
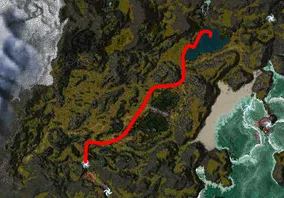 |
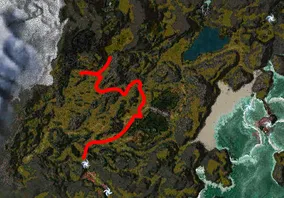 |
| Beach Route | Beach Cleanup |
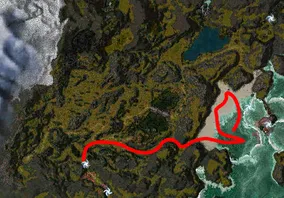 |
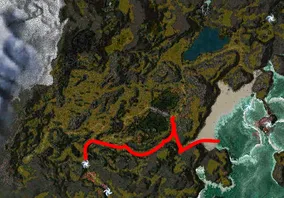 |
And then because why not:
If you would like to learn, or even better come for runs, contact me ingame at: Protectiv Was Latex
Just now seeing this haha. Guess I should update that under 2 hours run is a thing. And the current recorded fastest was the 2 hours and 11 minute run I got earlier in 2018.
Full run here
Just thought id update it since its been.. years now
i actually dont use any bars off of websites or anything i just make them from scratch. if you mean the three necros, i use one for minnion bombing and protting and what not but its my own take on it. also, people were asking me on other places to make a video to show them the mission done succesfully to see which order to kill things and other things. and after i put it here and linked it to them they were happy with it, sorry if this didnt please yall, i guess next time ill put more into it
edit: most videos i make are from people asking me to do them for them to help and so far everyones seemed quite happy. but i guess adding text would have been nice. i had to go out of town for a few days and wanted to get it out before i left.
I saw a person who was getting back into guild wars ask about this mission so I thought I would do it in hard mode with some heroes to show the easiest way to do it, because I think we have all struggled with it at least once before. Hopefully this helps someone out there!
Here are the ways I use to farm plant fibers in HM solo in the black curtain right outside the exit from ToA. It is really fast and simple ![]() If anyone would like to see a different way feel free to ask and I will make a way and video! Below includes rt, a, and r.
If anyone would like to see a different way feel free to ask and I will make a way and video! Below includes rt, a, and r.
Rt/Any or Any/Rt:
A/Me or Me/A:
R/A :
Here is a cool little video I did for something thats been around for a long time but not many people know about it or how to do it. It can help make the mission shorter yes but I think its fun sharing with everyone stuff about this game they may not have known before, hope you enjoy.
I became interested in Tihark almost a year ago, and I played around a lot with it and found some cool things on the wiki. I learned a lot of walk arounds and made a video about it even and kept learning more. I was able to get it to a 2 minute age but nobody cared really. Then the community became interested in record running missions, so I shared some of the info with one of my good friends. He was able to use it and him and others were able to do it in 1 minute age, very awesome. At the time I was too busy with travel and work to do it but I am glad I was able to help. Here is a video I made to show some cool things some of you may not have known about this solo mission in nightfall.
Okay this is a great place to farm fibers as well and solo and fast. Good old school drops as well if you get lucky. I am putting the few ways I know to do it here below.
A/Me Solo:
W/Mo Solo (Can only be done in NM safely and is kind of hard to get use to, mainly for fun):
R/A Solo (Normal way and a quick way I came up with):
Yes you could use a hero too for sure. And without EVAS it would be really hard to kill the bosses. The ele boss isnt too bad without EVAS if the hero brought like some kind of smite prayers skill maybe, like Balths aura, but might cause them to run. However I do not think the monk boss is killable in this method without EVAS. He is a pain in the butt even with it. Hourly income? Hmm it really depends. If you do it alone its possible to get a stack of fibers in half an hour. If you are splitting drops that time might go up but you could probably do it faster with a person making it balance a bit. Also that really depends on drop rates at the time you are doing it. I do this farm sometimes, and do it many ways. I will be sharing those too. But also, on my youtube channel I have other fiber farms which I like more if I want to solo farm. I will post those on this site tomorrow, as well as work to record other ways of doing this.
Edit: 100% Doable with hero. If you use a hero just dont plan on killing monk boss. Income depends on Anets love for you and drops x)
Here is a fun farm to do on a boss in Drazach Thicket for getting a boss green and elite ranger tomes. I am sure there might be a few ways but I just started trying this out after changing my fiber farm build up. Someone had asked about it so here you go, hope you enjoy.

